The finale of Prototyping Week: Interactions


If you’ve been following along on Twitter, you know we spent the last four days celebrating Prototyping Week at Figma, with daily releases like landscape device frames and clickable URLs.
Share The finale of Prototyping Week: Interactions
I worked on many of these updates during my summer engineering internship here at Figma, so I’ve enjoyed reading all your reactions (and predictions about what’s coming next). Before I head back to school, I have one last feature to leave you with: Interactions.
With Interactions, you can now add hover and pressed states to buttons as well as imitate long presses and dropdown menus. This should make your prototypes feel more realistic since elements will behave how they would in production. As always, the Figma community helped guide the form and priorities of our product, and we’re grateful to the teams who spent time working with us in the user research phase.
Read on for more details on Interactions, and a quick recap of everything we shipped this week!
Interactions
People interact with applications in a wide range of ways. They hover over buttons to view tooltips or press elements to see additional functionality, and they expect applications to respond automatically.
For a prototype to feel real, the buttons and elements inside it also need to respond to the user’s input in these predictable ways. Through our new Interactions feature, you can create these rich experiences for more accurate user testing.
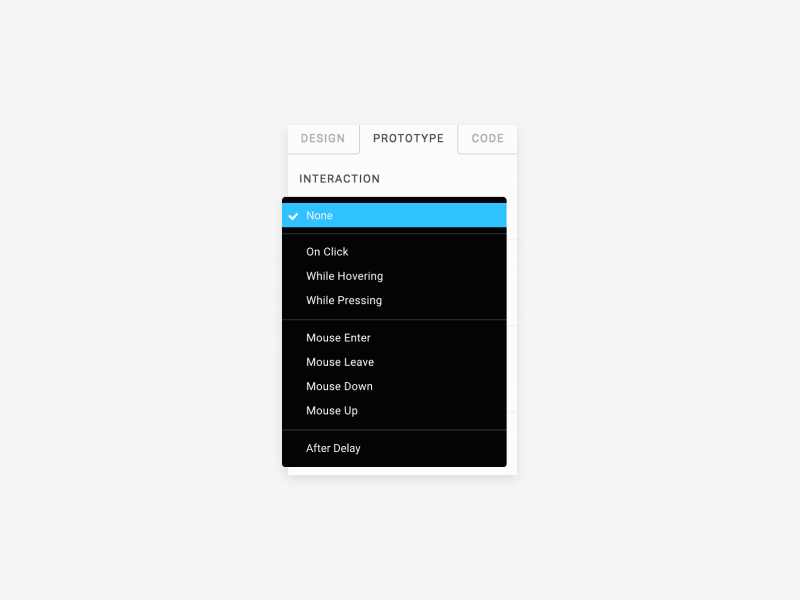
Here’s the full list of Interactions now available to you in Figma:
- On Click
- While Hovering
- While Pressing
- Mouse Enter
- Mouse Leave
- Mouse Down
- Mouse Up
- After Delay

There are three Interactions we think you’ll find most useful: “On Click”, “While Hovering” and “While Pressing.” These allow you to show hover states of buttons or communicate the pressed state of a list item. For example, if someone hovers over a menu item in your prototype, you can change the item’s background color.
Four of our new Interactions offer more advanced functionality: “Mouse Enter,” “Mouse Leave,” “Mouse Down” and “Mouse Up.” They give you more granular control about how the application responds to detailed behavior from the user. For example, if you use “Mouse Enter” on a button to show a dropdown menu, the menu will automatically stay open until the user performs a different interaction.
When you have a device frame selected, some interactions will appear as On Tap, Touch Down and Touch Up.
After Delay
We’ve also included the “After Delay” Interaction, which causes transitions to occur automatically after a specified amount of time. Use it to mimic things like notifications and auto-redirected pages.
You can only set an “After Delay” transition from one screen to another. After all, an “After Delay” transition isn’t tied to any specific sublayer of the frame.
All this can be a bit abstract, until you play with it. Go check out Interactions yourself in the tool (you’ll find it in the prototype section of the right hand sidebar). To learn more about how to use them, visit our Help Center.
Interactions are the final surprise we have for you in Prototyping Week. For those who don’t follow our Twitter account, here’s the rundown of everything else we shipped this week.
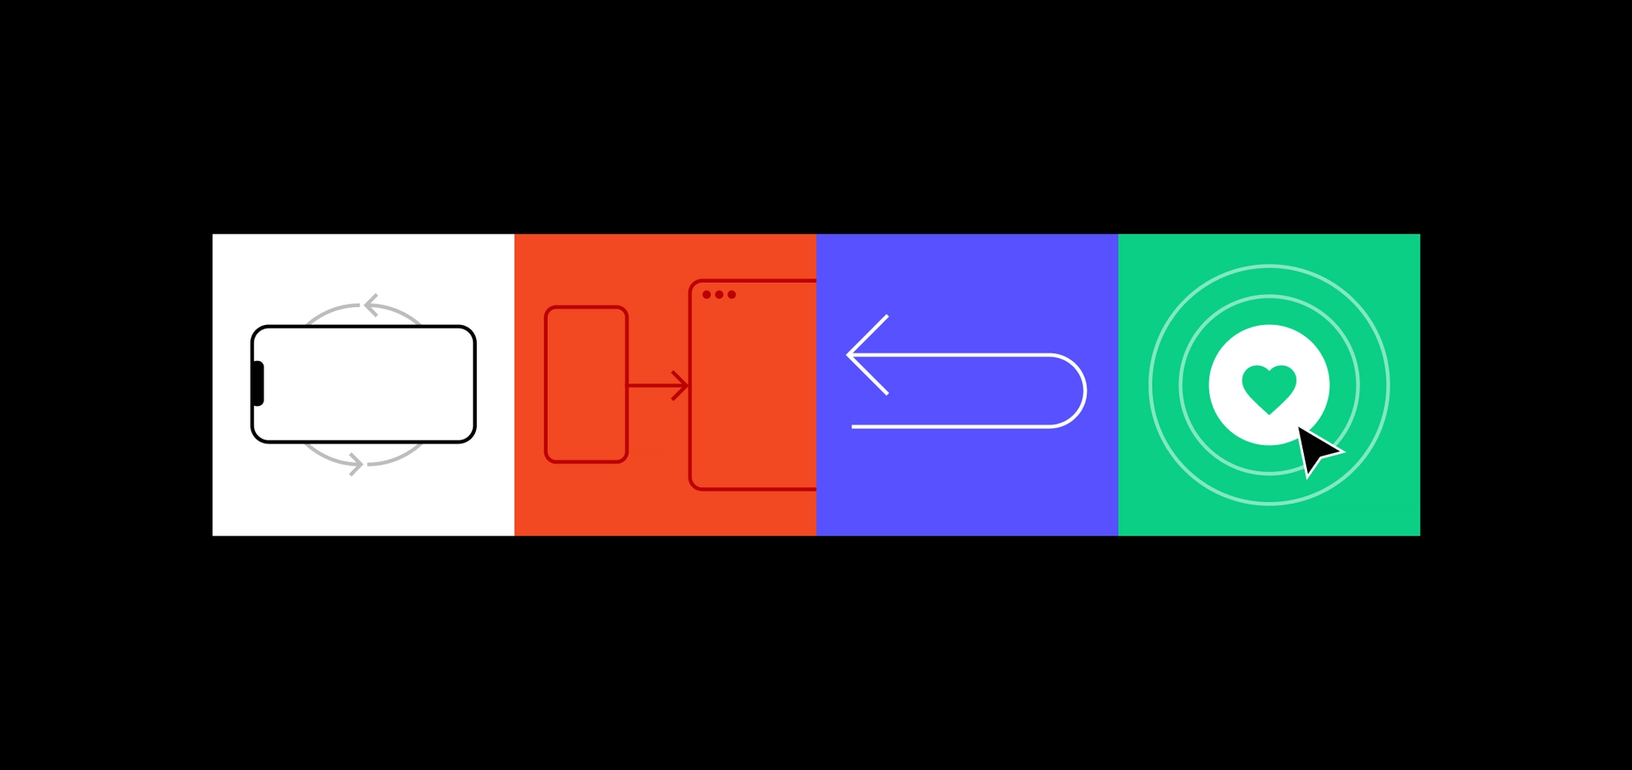
Monday: Landscape Device Frames
We released Figma 3.0 two months ago and added device frames around designs in presentation view. Now you can set device frames around screens that are meant to be viewed sideways.
Tuesday: Clickable URLS
To integrate Figma designs more with other content, we introduced Clickable URLs, which let you link a prototype frame to an external web link or another Figma file. For example, you could link to a personal website at the end of a presentation deck and send viewers directly to your portfolio when they click the link.
Wednesday: Back Transitions
Back Transitions act exactly the way they’re named. Sometimes, you’ll want users of your prototype to be able to return to the previous screen — for instance, you may be designing a confirmation menu. And, if the screen can be accessed from several different locations, Back Transitions allow you to keep track of where the user started without duplicating the screen and transition for each initial location.
One thing to note: If you navigate to the current frame with an animated transition, pressing the back button will play that animation in reverse. The gif above shows this in action.
What’s next?
The team is hard at work developing additional features. We’ve heard a lot from the community about Overlays — let us know what else you’d like to see from our prototyping tool set on Spectrum!