Our path to creating a precise PDF Exporter
Figma introduces PDF Export
Share Our path to creating a precise PDF Exporter
In the ephemeral and changing world of digital design, PDF - a format born when software came in a box and phones had cords - remains essential. From iOS developers who import vector representations of designs to individuals who leverage its precise color handling for printing digital assets, PDF’s applications are vast. Unsurprisingly, the ability to export designs to PDF is perhaps the most requested feature here at Figma.
Today, we are excited to deliver on this request by introducing a PDF export option in Figma. We paid special attention to quality so you can rely on it to represent your work accurately to clients and stakeholders.
How it works
Turning your designs into a high-fidelity PDF is as simple as pushing a button. You can export a selection of layers or even an entire page.
Simply select whatever you wish (or nothing for the whole page), scroll to the bottom of the Properties Panel, pick the new PDF option, and enjoy!

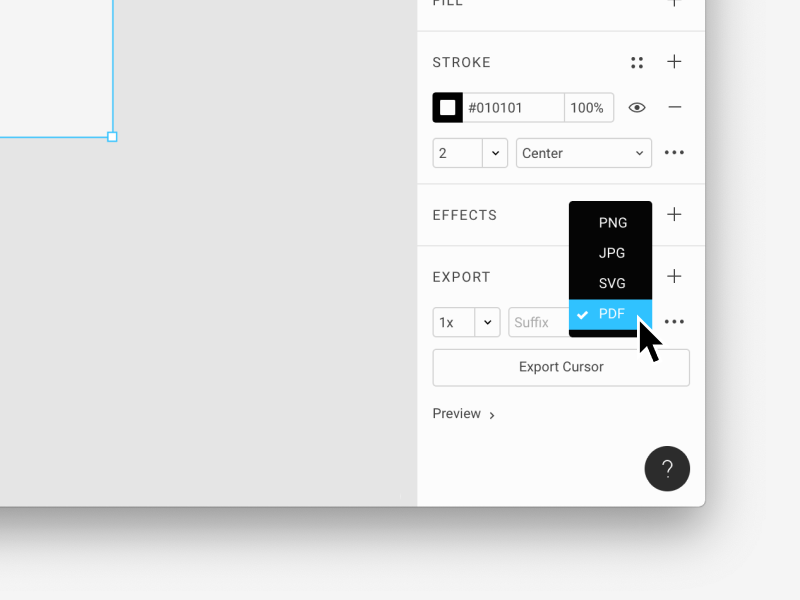
Alternatively, to export all of the frames in a Figma page to a single, multi-page PDF file, choose the “Export Frames to PDF” option in the File Menu. Within the PDF file, each frame will be on its own page, ordered according to its position in Figma, from top-left working down to bottom right.
To see more details, check our our documentation. For the story of its creation and some highlights showing how we honed particular elements of the exporter, read on!
Building the foundation
We pursue quality relentlessly at Figma. After poring over 1300 pages of documentation and scrutinizing existing libraries, we discovered existing tools forced us to make unacceptable compromises. So we decided to build our own PDF library from scratch. This gave us the control and precision necessary to meet the standards we strive to maintain for our users.
As a format, PDF is different from PNG because it contains a detailed description of your designs, not merely an image of them. This is how PDF text and drawings can look crisp at any zoom level - it’s fundamentally a vector format, like SVG, but much more complex. However, PDF descriptions can be hard to wrangle and optimize. Since PDF can contain embedded images alongside vector representations, this gives engineers an easy way out when things get difficult. It’s always possible to give up and rasterize on a complex effect or gradient and put in a picture of it rather than describing it precisely.
It’s exactly this compromise, to rasterize or to fight on, that we needed total control over in order to make our exporter really shine. This is especially critical for print applications when the output medium is large, or for digital applications where a variety of sizes of the same asset need to be generated. If we let some big, unsightly pixels show on your perfectly tuned work, we’d be letting you down, and we love you too much to do that!
Feature highlights
With the foundational library in place, we met the challenge of representing complex design elements like shadows, blurs and gradients head on. But this is where PDF’s ambitious scope becomes a liability - no viewer supports the format completely. This is especially the case when using PDF’s sophisticated shading techniques. These attributes produce a minefield of bugs in viewers which we had to navigate. Here’s how we ensure your work comes out unscathed in the export process:
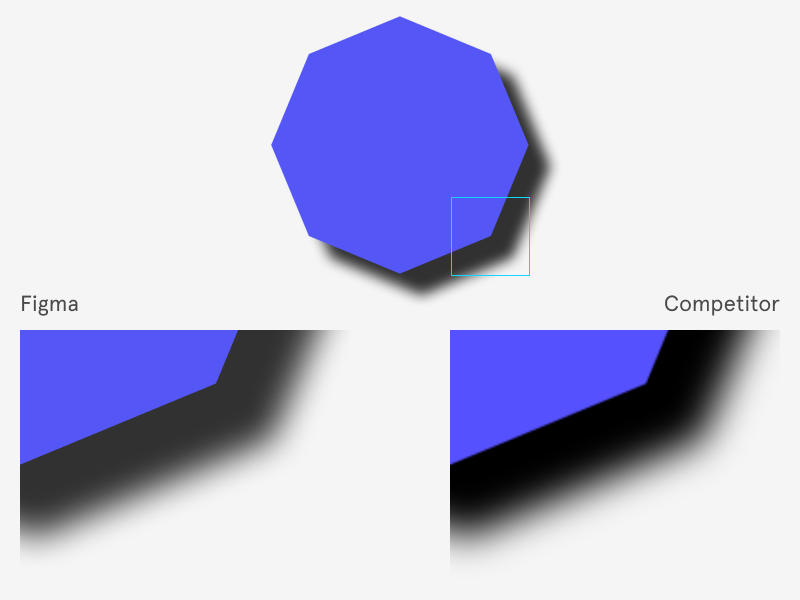
Shadows
Drop shadows can be tricky to make look crisp and clean. The concept is simple enough: just make a stencil of the shape, fill it in and smudge out the edges. Inner shadows are sort of the inverse of this, but still very similar. This is straightforward to accomplish at the shader level in a graphics pipeline, but PDF doesn’t provide us with that level of control. So we have to synthesize the result in code.
To deliver high quality here, we finely rasterize the blurry parts region itself and make a soft mask out of it, allowing forms behind the shadow to remain sharp. We also take care to accurately clip the shadow or blur with vector methods where the blurred node’s boundary truncates the blur. This means that cracks will never appear between a blur and its parent path.

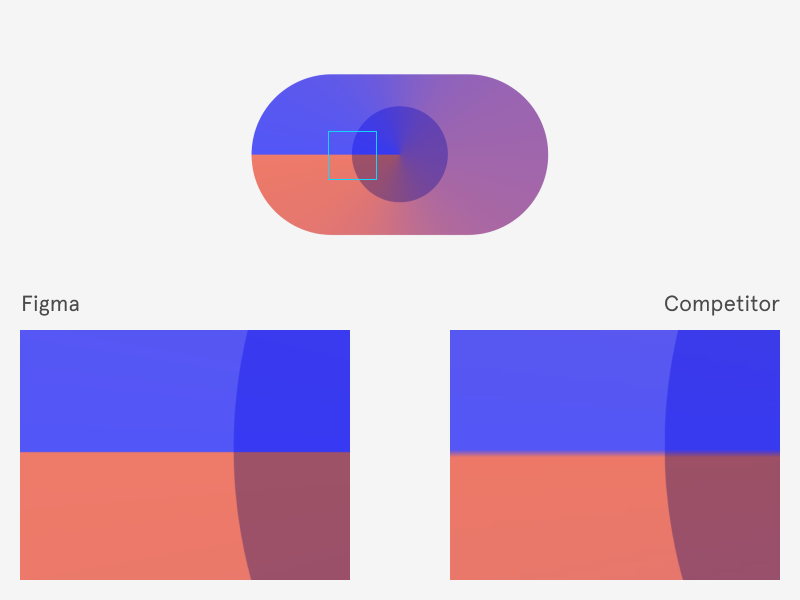
Gradients
Common gradients like the linear and elliptical types are relatively straightforward to make in PDF. In fact, the format provides shading techniques specifically for these purposes. Complex gradients on the other hand - angular types and Figma’s special diamond gradient - can be particularly tricky to recreate with precision.

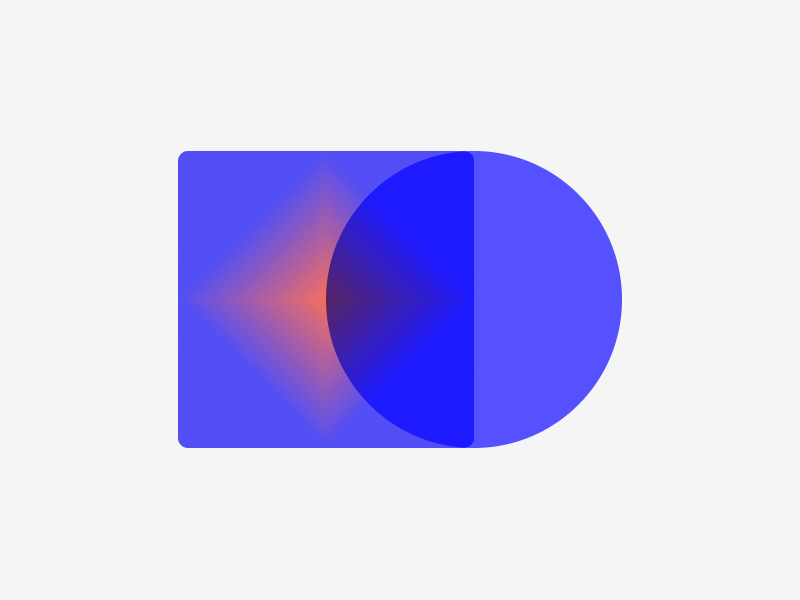
The reason for this is twofold. First, the PDF feature set required to represent these is at a pretty low level, stitching together a patchwork of smaller, more simply colored regions. This is vastly superior to rasterization, but careful mathematical work is required to keep control of approximation and numerical error.
The second difficulty comes from the bugs that arise in viewers. For angular gradients in particular, PDF affords several elegant and sophisticated solutions to the problem, but only one, used in a particular way, is supported by all the major viewers (including OSX preview!) that our users depend on. This kind of delivery is only bought with sweat.

Give PDF in Figma a spin!
We are excited to add the graphical power and interchange utility of PDF to the ways Figma lets you communicate your designs to the world. As always, let us know any feedback, issues, or inspired feature ideas by getting in touch via our friendly Spectrum community.
The fight against rasterization is by no means over. And other optimizations and advanced options for tighter control will keep coming on into the new year. So stay tuned, and let your imagination run wild! We’re up to the challenge.